Core Practical: Investigating Refraction
2 guided lessons · 18 checks · 3. Waves → Reflection & Refraction
Guided lessons for this note
Which concept don't you understand yet?
We'll explain it simply and check your understanding. Pick any lesson — any order works.
0 of 18 checks correct so far
Lesson 1 of 2
Refraction core practical: variables & method
The experiment asks how light refracts through different block shapes. You change the shape of the block and observe the direction of refraction, keeping the beam width and the light frequency fixed. Tracing the beam with pencil marks and a drawn normal turns each pass into a measurable ray diagram.
What you know already
Core practicals are examinable as procedures, not just ideas. This one sends a narrow light beam into perspex blocks of three shapes and records where the rays go, so that refraction can be measured rather than merely described. Method, variables, evaluation and safety are the four examiner touchpoints here.
Key points of understanding
- The independent variable is the shape of the block.
- The dependent variable is the direction of refraction.
- Control variables include the width of the light beam and the frequency of the light.
- The method marks the ray on the paper, draws normals, and joins entry and exit points with straight lines.
- Each perspex shape, rectangular, semi-circular and prism, is traced and repeated at different angles.
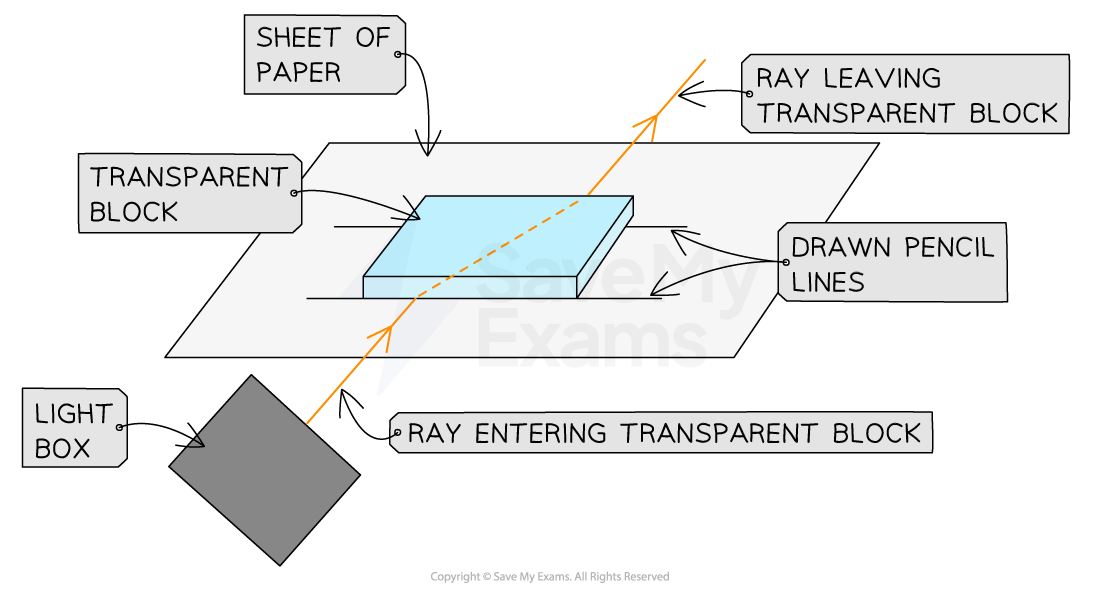
Apparatus to investigate refraction
Choose a confidence level to continue.
Prefer to read it all at once? Show the full lesson as a page
1.Refraction core practical: variables & method
The experiment asks how light refracts through different block shapes. You change the shape of the block and observe the direction of refraction, keeping the beam width and the light frequency fixed. Tracing the beam with pencil marks and a drawn normal turns each pass into a measurable ray diagram.
Apparatus to investigate refraction
Key points
- The independent variable is the shape of the block.
- The dependent variable is the direction of refraction.
- Control variables include the width of the light beam and the frequency of the light.
- The method marks the ray on the paper, draws normals, and joins entry and exit points with straight lines.
- Each perspex shape, rectangular, semi-circular and prism, is traced and repeated at different angles.
First pass
You draw around each block, fire a narrow beam at its face, mark where the ray enters and leaves, then join the marks with straight lines to reveal the refracted path.
Analogy — Footprints in snow: mark where the traveller stepped in and out, then join the prints to recover the route.
Exam pointer — Variable questions expect the exact pairing: shape changed, direction of refraction measured.
Going deeper
Drawing around the block before removing it is what makes the geometry recoverable: the outline plus the marked points reconstruct entry and exit normals, so the refraction at each face can be compared across shapes.
Analogy — Chalking around a fallen object at a scene: the outline preserves the exact position long after it is moved.
Exam pointer — Method marks reward the sequence: outline, beam, marks, normal, join; quote them in that order.
Checks
0 of 9 attempted · 0 correct
2.Refraction core practical: results, evaluation & safety
The traced rays build a multi-path diagram per block, each path labelled for a different incidence angle, and together they show how the refraction angle follows the incidence angle through every shape. Evaluation separates systematic slips, like wrongly drawn perpendiculars, from random marking errors, and safety rules protect eyes and skin from the ray box.
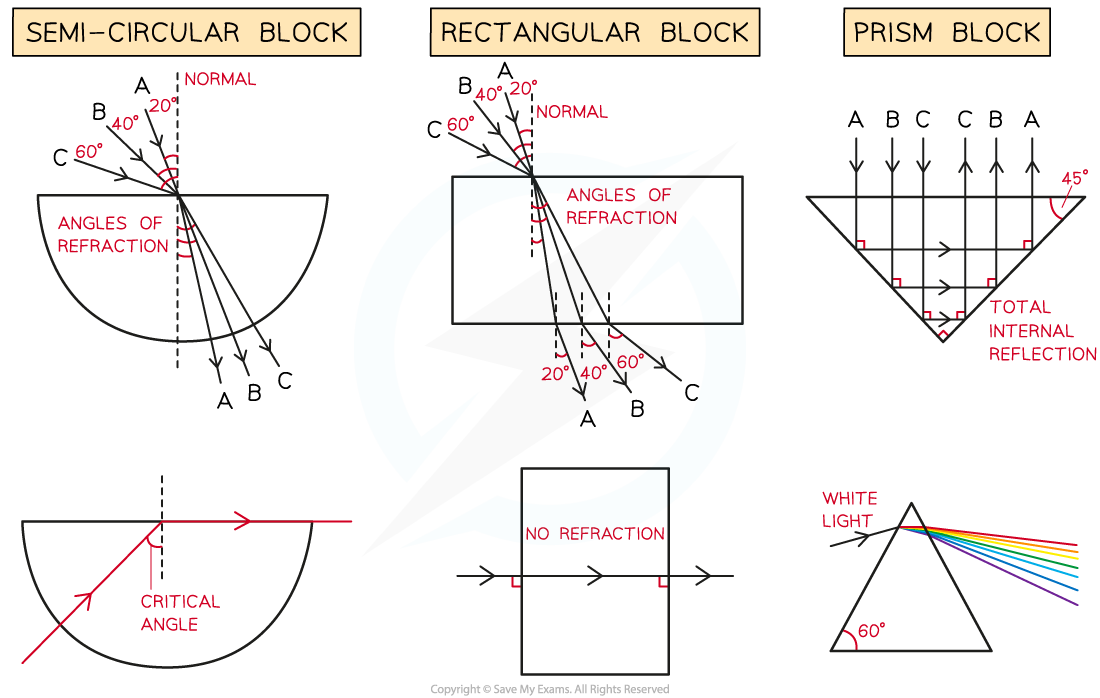
Refraction of light through different shapes of perspex blocks
Key points
- Each block diagram carries several labelled ray paths for different incidence angles.
- A systematic error arises if the ninety-degree normal lines are drawn wrongly.
- Random errors arise from inaccurately marked beam points and protractor resolution.
- A set square improves the perpendiculars; a sharpened pencil marks the beam centre.
- Safety: never look into the light, stand behind the ray box, and keep liquids away from equipment.
First pass
Label the ray paths clearly, then judge the experiment: perpendicular-line slips are systematic, shaky point-marking and protractor limits are random, and the ray box needs eye and burn precautions.
Analogy — Marking a running track: paint the lanes straight (systematic care) and time runners precisely (random care).
Exam pointer — Evaluation answers must sort errors into systematic versus random before suggesting fixes.
Going deeper
The error taxonomy maps to fixes: a set square removes the systematic perpendicular bias, while beam-centre marking and a higher-resolution protractor shrink the random scatter, and labelled paths let refraction angles be compared fairly across shapes.
Analogy — Calibrating scales: fix the zero first (systematic), then repeat and average the readings (random).
Exam pointer — Safety marks are free marks: burns, eyes and liquids are the three listed hazards; quote all three.
Checks
0 of 9 attempted · 0 correct
Guided content from the SME authoring corpus — note rn_N74nsXGBw66yzqSf, pinned at dad406f1ecd8 · promoted SyllabAI/syllabai-resources b3caaaa90c5e